5

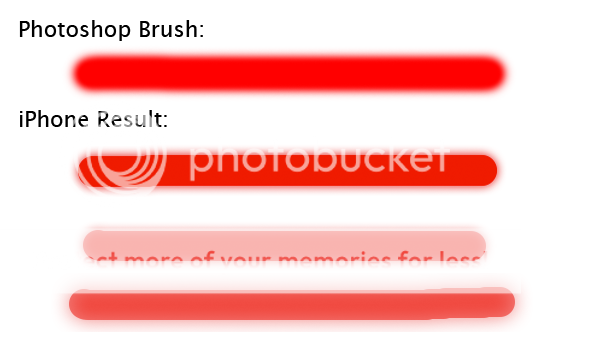
Photoshop のような次のブラシの滑らかさ (硬さ) 効果を取得するにはどうすればよいですか?

私の試み:

CGContextRef context = UIGraphicsGetCurrentContext(); 
CGContextSaveGState(context);
CGContextSetLineCap(context, kCGLineCapRound);
CGContextSetLineWidth(context, 30);
CGContextSetStrokeColorWithColor(context, [UIColor colorWithRed:1.0f green:0.0f blue:0.0f alpha:0.5f].CGColor);
CGContextSetShadowWithColor(context, CGSizeMake(0, 0), 20.0f, [UIColor colorWithRed:1.0f green:0.0f blue:0.0f alpha:1.0f].CGColor);
CGContextAddPath(context, path);
CGContextStrokePath(context);
CGContextRestoreGState(context);

アルファ値と影のぼかし係数を調整してみましたが、うまくいきませんでした。

誰にもこれに対する解決策はありますか?どんな助けでも大歓迎です。

4

4 に答える 4

12

この画像では、次のコード結果を確認できます。私はそれがあなたが望むものとほぼ同じだと信じています。

ここに画像の説明を入力

外側の影だけでは滑らかな効果を得るには不十分です。

- (void)drawRect:(CGRect)rect {

    CGContextRef context = UIGraphicsGetCurrentContext();

    // Shadows
    UIColor* shadow = UIColor.redColor;
    CGSize shadowOffset = CGSizeMake(0.1, -0.1);
    CGFloat shadowBlurRadius = 11;
    UIColor* shadow2 = UIColor.whiteColor; // Here you can adjust softness of inner shadow.
    CGSize shadow2Offset = CGSizeMake(0.1, -0.1);
    CGFloat shadow2BlurRadius = 9;

    // Rectangle Drawing
    UIBezierPath* rectanglePath = [UIBezierPath bezierPathWithRoundedRect: CGRectMake(59, 58, 439, 52) cornerRadius: 21];
    CGContextSaveGState(context);
    CGContextSetShadowWithColor(context, shadowOffset, shadowBlurRadius, [shadow CGColor]);
    [UIColor.redColor setFill];
    [rectanglePath fill];

    // Rectangle Inner Shadow
    CGContextSaveGState(context);
    UIRectClip(rectanglePath.bounds);
    CGContextSetShadowWithColor(context, CGSizeZero, 0, NULL);

    CGContextSetAlpha(context, CGColorGetAlpha([shadow2 CGColor]));
    CGContextBeginTransparencyLayer(context, NULL);
    {
        UIColor* opaqueShadow = [shadow2 colorWithAlphaComponent: 1];
        CGContextSetShadowWithColor(context, shadow2Offset, shadow2BlurRadius, [opaqueShadow CGColor]);
        CGContextSetBlendMode(context, kCGBlendModeSourceOut);
        CGContextBeginTransparencyLayer(context, NULL);

        [opaqueShadow setFill];
        [rectanglePath fill];

        CGContextEndTransparencyLayer(context);
    }
    CGContextEndTransparencyLayer(context);
    CGContextRestoreGState(context);

    CGContextRestoreGState(context);
}

形状のサイズに関しては、内側と外側の両方の影のぼかし半径を調整する必要があります。
于 2014-08-08T23:05:10.007 に答える
4

シャドウとストロークをブレンドすることで、達成しようとしているものと同様の効果を得ることができます

CGContextRef context = UIGraphicsGetCurrentContext();
CGContextAddPath(context, path);
CGContextSetLineCap(context, kCGLineCapRound);
CGContextSetLineWidth(context, self.lineWidth);
CGContextSetStrokeColorWithColor(context, [UIColor whiteColor].CGColor);
CGContextSetShadowWithColor(context, CGSizeMake(0.f, 0.f), self.lineWidth/4, [self.lineColor CGColor]);
CGContextSetBlendMode(context, kCGBlendModeMultiply);
CGContextSetAlpha(context, self.lineAlpha);
CGContextStrokePath(context);

乗算ブレンディング モードで、白い色をストロークの色として使用し、必要なブラシの色を影に設定すると、次の結果が得られます。

ここに画像の説明を入力

描画関数を touchesMoved イベントに接続したので、画像の一部を描画するのに時間がかかるほど、「ブラシ」の描画が難しくなります (黒い線を参照)。

于 2015-11-25T14:11:01.690 に答える
1

これはおそらく完璧な答えではありませんが、私のニーズに対してできる最善の方法です。

FXBlurView を入手してください: https://github.com/nicklockwood/FXBlurView

FXBlurView でストロークを描画するか、描画が終了したら UIView を UIImage に変換できます (この回答https://stackoverflow.com/a/22494886/505259から取得したコードを使用):

+ (UIImage *) imageWithView:(UIView *)view
{
    UIGraphicsBeginImageContextWithOptions(view.bounds.size, view.opaque, 0.0f);
    [view drawViewHierarchyInRect:view.bounds afterScreenUpdates:NO];
    UIImage * snapshotImage = UIGraphicsGetImageFromCurrentImageContext();
    UIGraphicsEndImageContext();
    return snapshotImage;
}

UIImage で FXBlurView のカテゴリを使用します。

- (UIImage *)blurredImageWithRadius:(CGFloat)radius
                         iterations:(NSUInteger)iterations
                          tintColor:(UIColor *)tintColor;

結果の画像をぼかして、Photoshop のソフト ブラシのような外観にします。

私はまだ本当の答えを探しています。Photoshop のソフト ブラシ ツールの正確なレプリカを必要とする OpenCV プロジェクトがあります。

于 2014-08-11T09:38:40.683 に答える