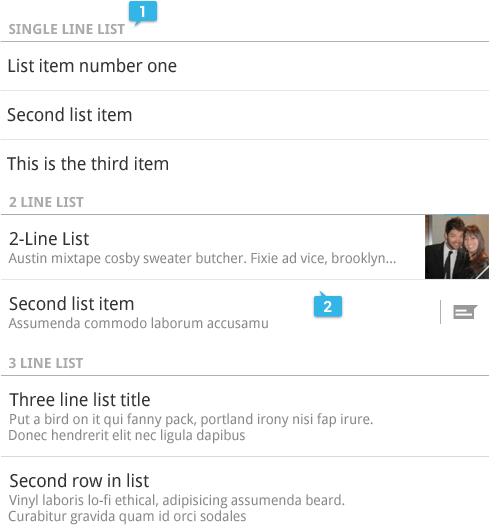
ここでは番号 2 で示されているように、各項目に 1 つ以上のアクション ボタンがあるリストを Android で作成しようとしています。

これを行うための事前定義された方法またはテンプレートはありますか、またはリスト内のアイテムのビューを、セパレーター、アクション ボタン、およびすべてを使用して手動で作成する必要がありますか? (その場合、私もそれについての助けをいただければ幸いです:))
ありがとう!
ここでは番号 2 で示されているように、各項目に 1 つ以上のアクション ボタンがあるリストを Android で作成しようとしています。

これを行うための事前定義された方法またはテンプレートはありますか、またはリスト内のアイテムのビューを、セパレーター、アクション ボタン、およびすべてを使用して手動で作成する必要がありますか? (その場合、私もそれについての助けをいただければ幸いです:))
ありがとう!
行の独自のレイアウトを作成する必要があります。(セパレーターを実行する必要はありません。)
私は自分のアプリの1つでこれを行います。アイテムに使用するレイアウトの 1 つを次に示します。
<?xml version="1.0" encoding="utf-8"?>
<RelativeLayout xmlns:android="http://schemas.android.com/apk/res/android"
    android:layout_width="match_parent"
    android:layout_height="match_parent">

    <ImageView
        android:id="@+id/icon"
        android:layout_width="wrap_content"
        android:layout_height="wrap_content"
        android:layout_alignParentLeft="true"
        android:layout_alignParentTop="true"
        android:contentDescription="@string/contentDescription_itemIcon"
        android:src="@drawable/album_placeholder" />

    <Button
        android:id="@+id/playButton"
        android:layout_width="40dp"
        android:layout_height="40dp"
        android:layout_alignParentRight="true"
        android:layout_alignParentTop="true"
        android:focusable="false"
        android:focusableInTouchMode="false" />

    <Button
        android:id="@+id/queueButton"
        android:layout_width="40dp"
        android:layout_height="40dp"
        android:layout_alignParentTop="true"
        android:layout_toLeftOf="@id/playButton"
        android:focusable="false"
        android:focusableInTouchMode="false" />

    <TextView
        android:id="@+id/mainText"
        android:layout_width="wrap_content"
        android:layout_height="wrap_content"
        android:layout_alignParentTop="true"
        android:layout_marginLeft="4dp"
        android:layout_toLeftOf="@id/queueButton"
        android:layout_toRightOf="@id/icon"
        android:text="@string/placeholder_mainText" />

    <TextView
        android:id="@+id/rightAdditionalText"
        android:layout_width="wrap_content"
        android:layout_height="wrap_content"
        android:layout_alignBaseline="@id/leftAdditionalText"
        android:layout_marginRight="4dp"
        android:layout_toLeftOf="@id/queueButton"
        android:text="@string/placeholder_rightText" />

    <TextView
        android:id="@+id/leftAdditionalText"
        android:layout_width="wrap_content"
        android:layout_height="wrap_content"
        android:layout_alignLeft="@id/mainText"
        android:layout_below="@id/mainText"
        android:layout_marginTop="0dp"
        android:layout_toLeftOf="@id/rightAdditionalText"
        android:text="@string/placeholder_leftText" />

</RelativeLayout>
私が使用しているアダプターは次のとおりです。
private class ItemAdapter extends ArrayAdapter<T> {
    private int rowLayoutId;

    public ItemAdapter(Context context, int rowLayoutId, T[] items) {
        super(context, 0, items);
        this.rowLayoutId = rowLayoutId;
    }

    @Override
    public View getView(int position, View convertView, ViewGroup parent) {
        View v = convertView;
        if (v == null) {
            LayoutInflater vi = (LayoutInflater)getContext().getSystemService(Context.LAYOUT_INFLATER_SERVICE);
            v = vi.inflate(rowLayoutId, null);
            v.findViewById(R.id.queueButton).setOnClickListener(onQueueButtonClicked);
            v.findViewById(R.id.playButton).setOnClickListener(onPlayButtonClicked);
        }

        T item = getItem(position);
        if (item != null) {
            setText(v, R.id.mainText, item.name);
            fillRowView(v, item);
        }
        v.setTag(item);
        return v;
    }
}
私のものは、すべてのアイテムの行レイアウト ID でパラメーター化されていますが、別の方法で行うこともできます。setText() および fillRowView() 関数は、含まれているクラスで定義されたヘルパーです。
item オブジェクトを行ビューのタグに設定しているので、後でボタン クリック ハンドラーで取得できることに注意してください。
View.OnClickListener onPlayButtonClicked = new View.OnClickListener() {
    @Override
    public void onClick(View button) {
        View listItem = (View)button.getParent();
        Object tag = listItem.getTag();
        try {
            @SuppressWarnings("unchecked")
            T item = (T)tag;
            // do someting with item
        }
        catch (ClassCastException e) {
        }
    }
};
これがどのように見えるかをここで見ることができます