iPhone OS 3.1.3でCATiledLayerを使用したいのですが、これを行うには、すべての描画-(void)drawLayer:(CALayer *)layer inContext:(CGContext)contextをコアグラフィックのみで行う必要があります。
今、私はiPhoneの反転座標系の問題に遭遇し、変換を使用してそれを修正する方法についていくつかの提案があります。
私の問題は、それを機能させることができないということです。PhotoScrollerのサンプルコードを使い始め、描画メソッドをコアグラフィックス呼び出しのみに置き換えました。こんな感じ
- (void)drawLayer:(CALayer *)layer inContext:(CGContextRef)context {
CGContextSaveGState(context);
CGRect rect = CGContextGetClipBoundingBox(context);
CGFloat scale = CGContextGetCTM(context).a;
CGContextConcatCTM(context, CGAffineTransformMakeTranslation(0.f, rect.size.height));
CGContextConcatCTM(context, CGAffineTransformMakeScale(1.f, -1.f));

CATiledLayer *tiledLayer = (CATiledLayer *)layer;
CGSize tileSize = tiledLayer.tileSize;


tileSize.width /= scale;
tileSize.height /= scale;
// calculate the rows and columns of tiles that intersect the rect we have been asked to draw
int firstCol = floorf(CGRectGetMinX(rect) / tileSize.width);
int lastCol = floorf((CGRectGetMaxX(rect)-1) / tileSize.width);
int firstRow = floorf(CGRectGetMinY(rect) / tileSize.height);
int lastRow = floorf((CGRectGetMaxY(rect)-1) / tileSize.height);
for (int row = firstRow; row <= lastRow; row++) {
    for (int col = firstCol; col <= lastCol; col++) {
     //   if (row == 0 ) continue;
        UIImage *tile = [self tileForScale:scale row:row col:col];
        CGImageRef tileRef = [tile CGImage];
        CGRect tileRect = CGRectMake(tileSize.width * col, tileSize.height * row,
                                     tileSize.width, tileSize.height);
        // if the tile would stick outside of our bounds, we need to truncate it so as to avoid
        // stretching out the partial tiles at the right and bottom edges
        tileRect = CGRectIntersection(self.bounds, tileRect);
        NSLog(@"row:%d, col:%d, x:%.0f y:%.0f, height:%.0f, width:%.0f", row, col,tileRect.origin.x, tileRect.origin.y, tileRect.size.height, tileRect.size.width);

        //[tile drawInRect:tileRect];
        CGContextDrawImage(context, tileRect, tileRef);
// just to draw the row and column index in the tile and mark the origin of the tile with a red line
        if (self.annotates) {
            CGContextSetStrokeColorWithColor(context, [[UIColor whiteColor]CGColor]);
            CGContextSetLineWidth(context, 6.0 / scale);
            CGContextStrokeRect(context, tileRect);
            CGContextSetStrokeColorWithColor(context, [[UIColor redColor]CGColor]);
            CGContextMoveToPoint(context, tileRect.origin.x, tileRect.origin.y);
            CGContextAddLineToPoint(context, tileRect.origin.x+100.f, tileRect.origin.y+100.f);
            CGContextStrokePath(context);
            CGContextSetStrokeColorWithColor(context, [[UIColor redColor]CGColor]);
            CGContextSetFillColorWithColor(context, [[UIColor whiteColor]CGColor]);
            CGContextSelectFont(context, "Courier", 128, kCGEncodingMacRoman);
            CGContextSetTextDrawingMode(context, kCGTextFill);
            CGContextSetShouldAntialias(context, true);
            char text[30];
            int length = sprintf(text,"row:%d col:%d",row,col);
            CGContextSaveGState(context);
            CGContextShowTextAtPoint(context, tileRect.origin.x+110.f,tileRect.origin.y+100.f, text, length);
            CGContextRestoreGState(context);
        }
    }
}

CGContextRestoreGState(context);
}
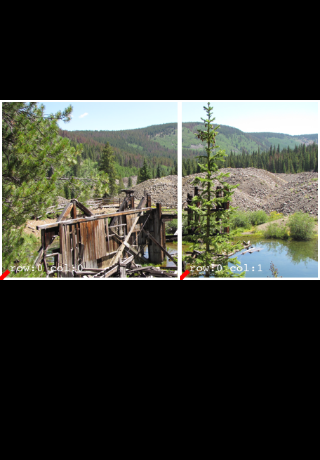
ご覧のとおり、座標系を反転するためにスケール変換を使用し、原点を左下隅にシフトするために平行移動変換を使用しています。画像は正しく描画されますが、タイルの最初の行のみが描画されています。平行移動やタイルの座標の計算方法に問題があると思います。
これはどのように見えるかです:

私はこのすべての変換に少し混乱しています。
ボーナスの質問:コアグラフィックスのRetinaディスプレイ画像をどのように処理しますか?
編集: Retinaディスプレイで動作させるために、サンプルコードから元の方法を使用して画像を提供しました。
- (UIImage *)tileForScale:(CGFloat)scale row:(int)row col:(int)col
{
// we use "imageWithContentsOfFile:" instead of "imageNamed:" here because we don't want UIImage to cache our tiles
NSString *tileName = [NSString stringWithFormat:@"%@_%d_%d_%d", imageName, (int)(scale * 1000), col, row];
NSString *path = [[NSBundle mainBundle] pathForResource:tileName ofType:@"png"];
UIImage *image = [UIImage imageWithContentsOfFile:path];
return image;
}
Core Graphicsはポイントではなくピクセルで動作するため、原則として表示のスケールは無視されます。したがって、より多くのピクセルを描画するように求められると、より多くのCATiledLayer(またはサブレイヤー)が画面全体に使用されます。
たくさんありがとうトーマス